2. Configure OWA Features
OWA comes with many
features that allow you to exercise granular control over user accounts.
Many of these features enable functionality that resembles the
full-featured Outlook desktop client. This section shows you how to
configure some of these features in your OWA implementation.
2.1. Modify Basic OWA Features
There are many features in OWA that you can enable or disable for users. In Exchange, these are called segmentation options. All of the segmentation options can be enabled and disabled through the EMC or through the EMS.
2.1.1. Modify Segmentation Options in the Exchange Management Console
To modify segmentation options in the EMC:
Open the EMC and browse to the Server Configuration => Client Access node in the Console tree.
In the Work area, select the Outlook Web App tab to display a listing of available OWA virtual directories.
Select the virtual directory that you are using from the list and click the Properties option in the Actions pane.
This will bring up the properties dialog box for that virtual directory.
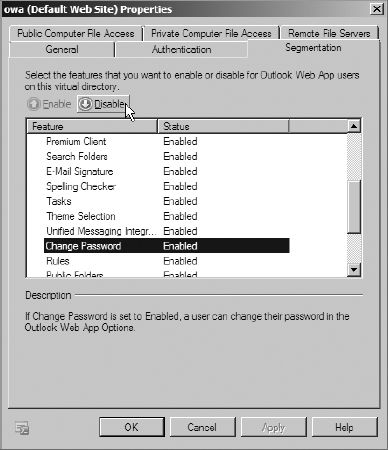
In the properties dialog box, click the Segmentation tab.
The list of segmentation options are displayed in the dialog box.
Select the option that you want to enable or disable and click the Enable or Disable button above the list, as shown in Figure 8.
After modifying the segmentation options, click OK to make the changes and close the properties dialog box.
2.1.2. Modify Segmentation Options in the Exchange Management Shell
To modify the segmentation options in the EMS, you will use the Set-OWAVirtualDirectory command. To enable or disable a particular segmentation option, you will need to supply the correct parameter, displayed in Table 1.
Table 1. EMS Parameters for OWA Segmentation Options
| Feature | Parameter |
|---|
| All Address Lists | AllAddressListsEnabled |
| Calendar | CalendarEnabled |
| Change Password | ChangePasswordEnabled |
| Contacts | ContactsEnabled |
| Email Signature | SignaturesEnabled |
| Exchange ActiveSync Integration | ActiveSyncIntegrationEnabled |
| Journal | JournalEnabled |
| Junk Email Filtering | JunkEmailEnabled |
| Notes | NotesEnabled |
| Premium Client | PremiumClientEnabled |
| Public Folders | PublicFoldersEnabled |
| Recover Deleted Items | RecoverDeletedItemsEnabled |
| Reminders and Notifications | RemindersAndNotificationsEnabled |
| Rules | RulesEnabled |
| S/MIME | SMimeEnabled |
| Search Folders | SearchFoldersEnabled |
| Spell Checker | SpellCheckerEnabled |
| Tasks | TasksEnabled |
| Theme Selection | ThemeSelectionEnabled |
| Unified Messaging Integration | UMIntegrationEnabled |
For example, to disable the ability for users to change their password from OWA, you can use the following command:
Set-OWAVirtualDirectory "CONTOSO-EX01\owa
(Default Web Site)"-ChangePasswordEnabled $false
2.2. Manage Web-Based Document Viewing
OWA users can view Microsoft
Office attachments and PDFs in OWA without having to install the Office
or PDF viewer software. This feature is known as web-ready document viewing. Table 2 lists the file types that are supported with web-ready document viewing.
Table 2. File Types Supported in Web-Ready Document Viewing
| File Type | Extension |
|---|
| Microsoft Word 2003 and earlier | .doc |
| Microsoft Word 2007 and later | .docx |
| Microsoft Word Template | .dot |
| PowerPoint SlideShow | .pps |
| Microsoft PowerPoint 2003 and earlier | .ppt |
| Microsoft PowerPoint 2007 and later | .pptx |
| Microsoft Excel 2003 and earlier | .xls |
| Microsoft Excel 2007 and later | .xlsx |
| Rich Text Format | .rtf |
| PDF Documents | .pdf |
2.2.1. Use the Exchange Management Console to Enable Web-Ready Document Viewing
You can enable web-ready document viewing in the EMC using the following steps:
Open the EMC and browse to the Server Configuration => Client Access node.
In the Work area, click the Outlook Web App tab to show the list of OWA virtual directories.
Select the OWA virtual directory and click the Properties option in the Actions pane.
In the properties dialog box, select the Private Computer File Access tab. Check the Enable WebReady Document Viewing option.
If
you want users to be able to use web-ready document viewing when
accessing OWA on public computers, use the Public Computer File Access
tab.
Click OK to close the dialog box and make the changes.
2.2.2. Use the Exchange Management Shell to Enable Web-Ready Document Viewing
You can also enable WebReady Document Viewing with the EMS using the Set-OWAVirtualDirectory command. To enable WebReady Document Viewing for private computers using OWA, use the WebReadyDocumentViewingOnPrivateComputersEnabled parameter. For public computers, use the WebReadyDocumentViewingOnPublicComputersEnabled parameter. The following example enables both on the default OWA site:
Set-OWAVirtualDirectory -Identity "OWA (Default Web Site)"
-WebReadyDocumentOnViewingPrivateComputersEnabled $true
-WebReadyDocumentOnViewingPublicComputersEnabled $true